I wrote an article on how to butcher a deer.
The site it was published on is gone but the links below will take you to a picture how-to
How to butcher a deer Pictoral-
Part 1
Part 2
Part 3
I have gotten more comments about these than anything else I have written.
I hope you enjoy.
Still clinging to my God and my guns,
Randy
Showing posts with label how to butcher a deer. Show all posts
Showing posts with label how to butcher a deer. Show all posts
Wednesday, November 11, 2009


Sunday, December 14, 2008
How to process a deer part 3 cutting and packaging
This is the final part of how to butcher your deer.

When you have the meat off of the bones it is time to cut and package it.
First take your two backstraps and cut off the membrane and dried parts so you have clean meat to cut.
Like this:

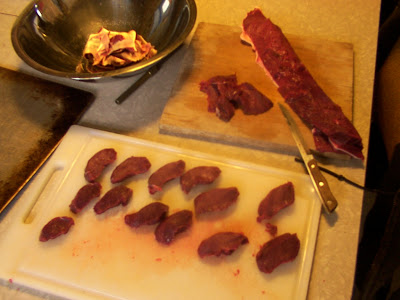
After it is cleaned of membrane I cut the backstraps into medallions.
On a larger animal you can get some excellent steaks from this filet mignon.
cut medallions like this:
Next grab one of the muscle groups you have boned out and start to clean the membrane, fat and gristle off.
Until you get something like this nice roast.

You can also cut this into steak if you prefer.
Always cut meat across the grain if you are making steaks.
Like this:

Continue on with all muscle groups.
Odd pieces of good meat can be made into stir fry or stew meat.
You can also use any of the meat you would use for steak or roast.
Cut it in pieces like this:

After you have all the "good" meat cut it's time for burger.
You can turn the whole thing into burger if you like.
Start by cutting the good meat away from tendons and membrane.
Like this:

Then get your bones and clean them up of all the meat you can cut off.
When I was young this was the job for us kids. We had to clean up all the bones and toss the meat in the burger cooler.
still some meat:

Some here on the carcass also.

We run it through the meat grinder at least twice.
Once very course and the second time on the middle setting.
We add no fat or suet to the meat. We won't be making hamburgers from it so when you brown it just add a little water or oil to keep it from sticking.
Here is Tanya grinding burger:
(looks thrilled I know)

When you are done cutting it is time to wrap.
If you want it to last a long time in your freezer wrap it in plastic wrap before putting it in your freezer paper.
I ate some elk that was wrapped this way that was over 5 years old and wasn't freezer burnt. (I wouldn't make a habit of it though)
Since this was a tiny deer and it will get eaten quickly we skipped the plastic and just used freezer paper.
The meat goes against the shiny side of the paper.
Like this:

Then just wrap it up and make sure and write the date and what type of meat is in the package.

Once we mistakenly cooked some loin in the crockpot and it turned to mush.
This wraps up how I butcher a deer, or an elk for that matter.
It may not be the best way but it's how I have come to do it.
Still clinging to my God and my guns
Randy

When you have the meat off of the bones it is time to cut and package it.
First take your two backstraps and cut off the membrane and dried parts so you have clean meat to cut.
Like this:

After it is cleaned of membrane I cut the backstraps into medallions.
On a larger animal you can get some excellent steaks from this filet mignon.
cut medallions like this:

Next grab one of the muscle groups you have boned out and start to clean the membrane, fat and gristle off.
Until you get something like this nice roast.

You can also cut this into steak if you prefer.
Always cut meat across the grain if you are making steaks.
Like this:

Continue on with all muscle groups.
Odd pieces of good meat can be made into stir fry or stew meat.
You can also use any of the meat you would use for steak or roast.
Cut it in pieces like this:

After you have all the "good" meat cut it's time for burger.
You can turn the whole thing into burger if you like.
Start by cutting the good meat away from tendons and membrane.
Like this:

Then get your bones and clean them up of all the meat you can cut off.
When I was young this was the job for us kids. We had to clean up all the bones and toss the meat in the burger cooler.
still some meat:

Some here on the carcass also.

We run it through the meat grinder at least twice.
Once very course and the second time on the middle setting.
We add no fat or suet to the meat. We won't be making hamburgers from it so when you brown it just add a little water or oil to keep it from sticking.
Here is Tanya grinding burger:
(looks thrilled I know)

When you are done cutting it is time to wrap.
If you want it to last a long time in your freezer wrap it in plastic wrap before putting it in your freezer paper.
I ate some elk that was wrapped this way that was over 5 years old and wasn't freezer burnt. (I wouldn't make a habit of it though)
Since this was a tiny deer and it will get eaten quickly we skipped the plastic and just used freezer paper.
The meat goes against the shiny side of the paper.
Like this:

Then just wrap it up and make sure and write the date and what type of meat is in the package.

Once we mistakenly cooked some loin in the crockpot and it turned to mush.
This wraps up how I butcher a deer, or an elk for that matter.
It may not be the best way but it's how I have come to do it.
Still clinging to my God and my guns
Randy
How to process a deer Part 2 deboning
This is part 2 of 3 of how to butcher your deer
After your deer is skinned it can be aged or butchered right away.
You will want to cut the internal tenderloins out before aging since they tend to dry out and then are no good.
They are tiny on this little deer almost not worth messing with.
I am pointing to them here:

After the tenderloins I start on the backstraps. This is the best part of the deer.
Take your knife and make a cut straight in on both sides of the backbone.
From the rear hips to the front shoulder/ neck area. Next cut in from the side, right along the top of the ribs and remove the backstrap.
Like this:

Repeat on the other side and you will end up with two pieces of meat like these.
MMMM filet mignon.....

Next it's time to start on the front shoulder. I grab the leg and pull it away from the body and start cutting at the thin meat and fat holding it on.
Like this:

It should come off in your hand with ease.
Repeat on the other side and you are ready to take them in and bone them.
Start by cutting the meat off the bones, keeping the muscle groups together.
Like this:

And this:

Until you end up like this.

Now it's time to get the rear quarters.
Take your knife and cut around the hip by the pelvis.
You can see I left a little too much meat on the carcass.
Like this:

Keep working your knife around the joint until it comes free.
Here is the inside view.

Then we take the rear quarters in and debone them like the front ones.
Like this:

A lot more meat on a rear quarter than on a front.
After you have it deboned you are ready to cut and package.
I will go over that in part 3
As I said this is how I was taught and how I've done it most of my years.
I don't like ribs and have never bothered with them on a deer or elk.
Some folks really like them but I'm not the one to ask about them.
Still clinging to my God and my guns
Randy
Friday, December 12, 2008
How to process a deer Part 1 Skinning
This is part 1 of 3 of how to butcher your deer.
I am processing my deer and will share the steps I take when I Butcher my own.
Normally it is best to hang and skin your deer while it is still warm. The meat will taste better and it will cool faster. This year I had too much wood to cut that day so I just propped it open with a stick so it would cool and then hung it in the garage. When I was younger we always left the hide on until it was time to butcher. It takes a lot longer to skin it when it's cold or frozen, but it is not the end of the world if you don't get it skinned right away.
To start the skinning process cut around the hind leg above the knee, then take the tip of your knife and split the skin down towards the tail.
Like this...

Do that on both rear legs and skin your way to the tail and cut through it with your knife.
Like this...

My knife is laying right below the severed tail bone. (the knife is a K-Bar 1100 I picked up at a flea market this summer for $2.50, I really like the carbon blades)
Once you have gotten through the tail bone you can probably pull the hide down to the front legs if the deer is still warm. My deer is mostly frozen so I had to help it along with the knife.
Grab the hide and pull down take your knife and make cuts along where the membrane is clinging to the hide .
Like this...
And this...

Continue skinning down the front legs until you get to the joint. I use pruning shears to cut off the leg and leave it attached to the hide.
Like this...

Do that to both sides and then continue all the way down to the neck. I use a bow saw to remove the head and the hide all in one piece.
Like this...

It should now look something like this...

But whats this????
There's hair all over my meat!!!

Never fear!
Propane torch to the rescue!!

Lightly go over the whole deer with the torch and singe off all the stray hairs.
Now you are ready to start cutting or letting it hang to age.
Still clinging to my God and my guns
Randy
I am processing my deer and will share the steps I take when I Butcher my own.
Normally it is best to hang and skin your deer while it is still warm. The meat will taste better and it will cool faster. This year I had too much wood to cut that day so I just propped it open with a stick so it would cool and then hung it in the garage. When I was younger we always left the hide on until it was time to butcher. It takes a lot longer to skin it when it's cold or frozen, but it is not the end of the world if you don't get it skinned right away.
To start the skinning process cut around the hind leg above the knee, then take the tip of your knife and split the skin down towards the tail.
Like this...

Do that on both rear legs and skin your way to the tail and cut through it with your knife.
Like this...

My knife is laying right below the severed tail bone. (the knife is a K-Bar 1100 I picked up at a flea market this summer for $2.50, I really like the carbon blades)
Once you have gotten through the tail bone you can probably pull the hide down to the front legs if the deer is still warm. My deer is mostly frozen so I had to help it along with the knife.
Grab the hide and pull down take your knife and make cuts along where the membrane is clinging to the hide .
Like this...

And this...

Continue skinning down the front legs until you get to the joint. I use pruning shears to cut off the leg and leave it attached to the hide.
Like this...

Do that to both sides and then continue all the way down to the neck. I use a bow saw to remove the head and the hide all in one piece.
Like this...

It should now look something like this...

But whats this????
There's hair all over my meat!!!

Never fear!
Propane torch to the rescue!!

Lightly go over the whole deer with the torch and singe off all the stray hairs.
Now you are ready to start cutting or letting it hang to age.
Still clinging to my God and my guns
Randy
Saturday, December 6, 2008
The Lord hath provided meat!!

Went out and did a walk through of the woods this morning.
I was as much looking for trespassers as I was hunting. I have two days during muzzle loading season already scheduled off at work. But I give it a little effort during regular gun season and do a slow stalk through the woods. Many times I will find a deer bedded and be able to get a shot.
I had already snuck through the woods and was on my way back along the front edge just inside the trees when up jumps this little button buck. I could tell right away it was wounded. You can see someone shot it in the left rear leg. I was able to walk up to it and put it out of it's misery. So God in his infinite wisdom sent a deer I could actually hit and gave us many good meals to come. He knew normally I would let a little deer like this go, I'm sure he knows something I don't and am grateful for the meat.
In the picture you can see my bowie knife. I got it for $2 at a flea market two summers ago. It is Pakistani stainless that is not the greatest quality but it worked just great on the little buck. The guard has a sharp spot on it that cut my hand a little and I will take a file to it before I use it again. I have never used a knife this big before but once I got the hang of it the size was a real plus in how fast I got the job done. It was a little tight in the chest cavity cutting things loose but worked out well. I had it gutted and in the truck in less than 10 minutes.
Now I'm done hunting and need to go get more wood. I'm only allowed one deer up in this part of the state.
Maybe I'll get some writing done with my two vacation days after Christmas.
Still clinging to my God and my guns
Randy
Subscribe to:
Posts (Atom)